
The spring storm season is typically followed by a surge in roof replacements nationwide. Damaging wind and hail tear shingles from roofs, leaving homeowners searching for the best deals from local roofers before the next round of storms.
Before hiring someone to take on this sort of project, it’s essential that you fully understand the process. There are several key elements to consider, including safety considerations, underlayment, and the type of shingle.
This article takes you through the process and provides a step-by-step outline for replacing your roof. By the end, you’ll thoroughly understand the job and be able to ask your contractor good questions before you sign.
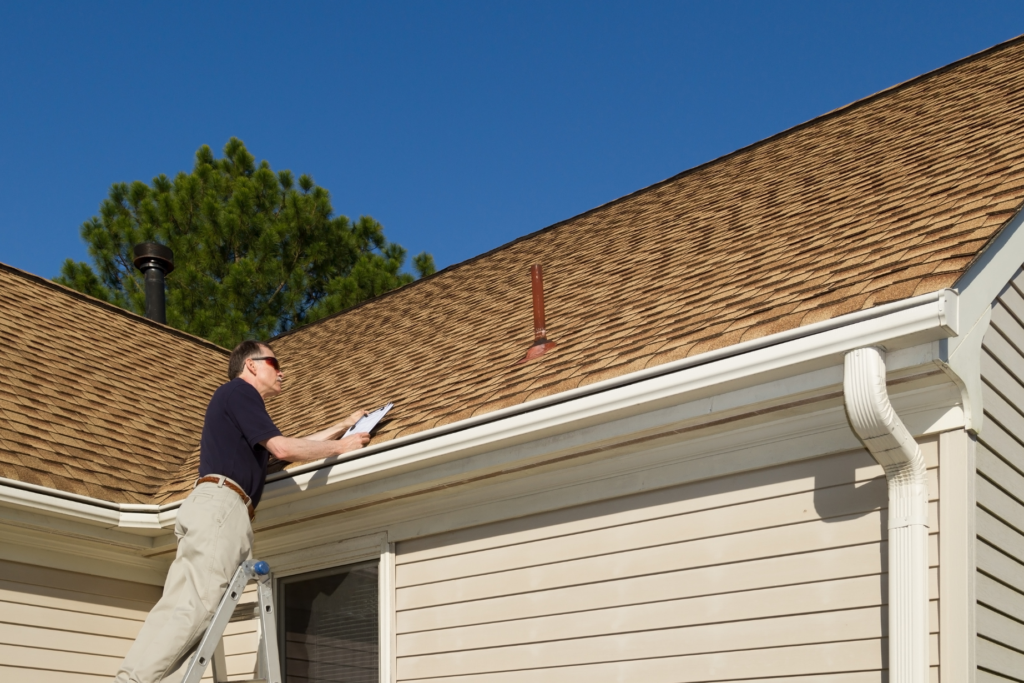
Checking out your roof doesn’t have to mean climbing a ladder and scoping things out. Looking from the ground up, you can likely see damaged shingles, curling edges, and other signs of damage. This type of inspection is best if you’re not sure whether you need a new roof or not.
Drones are another visual inspection option that doesn’t involve getting up on a roof deck. Most quadcopters can capture live or streaming video to assess the quality of your roof.
After you’ve taken the proper safety precautions, it’s time to begin your roof assessment. Visually inspect the roof for signs that replacement is necessary.
Look for:
Beyond the shingles, you should inspect the flashing around vents, skylights, chimneys, and other penetrations. The roof deck should have a consistent pitch, and you don’t want any signs of rot or sagging, which can indicate structural issues.
Along with all these factors, you’ll also want to inspect from inside the attic if you’ve got one. Look for signs of light coming through the roof deck or indications of water damage, such as wet or moldy insulation.
Conducting an inspection is typically best left to the pros, but you can get a sense of the scope of the damage by checking it out yourself first.
OSHA suggests specific safety guidelines that professionals must follow. Doing your own assessment doesn’t mean you should leave these recommendations behind.
Before getting your ladder out to assess your roof, consider some essential safety precautions.
OSHA points to extension ladders as the most commonly used in roofing because of their adjustable height. They recommend selecting one that meets your duty rating (user weight) and use case. If you’re using a ladder around electricity, non-conductive fiberglass is preferred.
With an average of around 115 roofer deaths attributed to falls each year, fall safety is vital. Fall arrest systems like harnesses might seem like overkill, but the numbers suggest otherwise. When working 6 feet or more above ground level, contractors should deploy a safety rig to prevent accidents.
Check weather forecasts before beginning any kind of roofing project. Getting caught in inclement weather can lead to falls, lightning strikes, and damage to the roof deck from exposure.
Gathering materials before starting is essential for any construction project. Contractors take the time necessary to create a comprehensive list of roofing materials, tools, and other resources to ensure they are ready to start on schedule.
First, you need the square footage or area of your roof. To find this number, measure the length and width of each roof plane and multiply those measurements to determine the square footage.
You’ll also need to account for pitch, or the degree to which your roof slopes upwards over one foot.
To calculate this with a level and tape measure:
If you had a rise of 6 inches and a run of 12 inches, you’d express pitch as 6:12. Generally, anything under 3:12 is a low pitch roof, and anything over 6:12 is a high pitch roof.
Once you’re comfortable with the area of your roof, you’ll divide that number by 33.3. A shingle bundle typically covers 33.3 square feet; that final number should be adequate to cover your roof. You may want to order 10% to 15% more in case of damaged shingles or miscalculations.
For example:
Use our roofing calculator to see what you need:
Temperature and weather patterns should also be considered when planning. You’ll want to avoid rainy seasons, peak heat, and severe or extreme weather. During hot summer days, the surface of your asphalt shingle roof can reach temperatures between 140°F and 190°F.
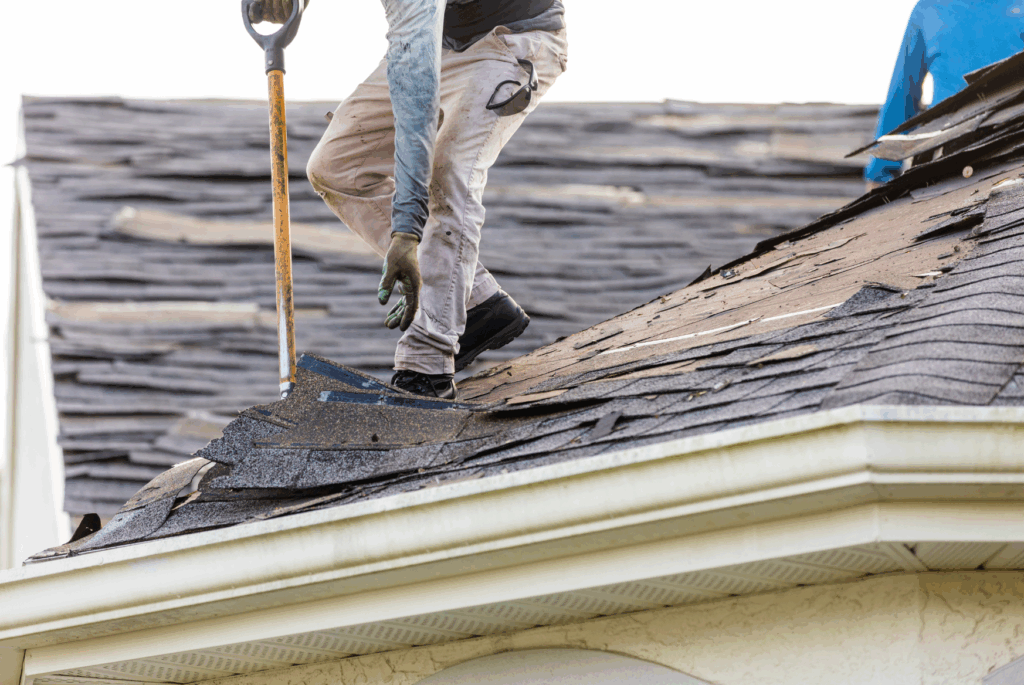
Tear-off is one of the most satisfying steps in installing a new roof.
Specialized tools make removing your old roof a fast and safe process. Use a shingle shovel or shingle remover to strip old shingles from the roof deck efficiently and effectively. A shingle nail puller may be needed as a backup to help with stubborn fasteners.
Most of the time, you’ll only have one layer of shingles to remove. In some cases, contractors may find several layers on the roof deck. This is a sign that the last roofer cut corners and failed to remove old or damaged shingles during the previous repair. You may have other issues that weren’t part of your initial plan.
Once you’ve removed the old shingles and underlayment, it’s time to inspect your roof deck. Inspect for loose panels, water damage, mold, and rot. Remove and replace these, as they can lead to further issues down the road.
Depending on your square footage, roofers may rent a roll-off dumpster to dispose of the construction debris.

When your crew clears the roof deck and makes any repairs, it’s time to install the new roof. There’s more to this process than just laying down shingles; following these best practices can help avoid future issues.
A water barrier system protects your roof deck from leaks and bulk water intrusion. Directing rain and snow off the roof and away from the home is essential, and there are various solutions to suit any situation.
Before laying down the underlayment, roofing crews install a drip edge. This product allows water to flow away from the fascia and other roofing materials, preventing damage. As the name implies, it’s installed along the edge of your roof deck before continuing the process.
Next, roofers install a shingle underlayment. Depending on where you live, a heavier ice and water shield may be necessary along the edge of your roof. Underlayment serves as the second line of defense against wind-driven rain and snow accumulation.
Self-adhering solutions are a good choice as they self-seal around fasteners used to secure shingles to the deck.
Roofers pay special attention to eaves, valleys, and any low points where pooling could occur. Secondary layers of underlayment help provide more substantial resistance to damage and leaks.
Contractors install a starter strip after applying shingle underlayment. Typically half the width of a full shingle, they are used along the drip edge, overlapping the edge by approximately a quarter of an inch. This row helps keep your starter row in place and prevents water from getting past the drip edge.
The first course of shingles should start with a full sheet across the bottom edge of your roof. The following rows should be cut so that seams don’t line up and leave your roof susceptible to water intrusion.
Check out this video for a more in-depth look at shingle installation:

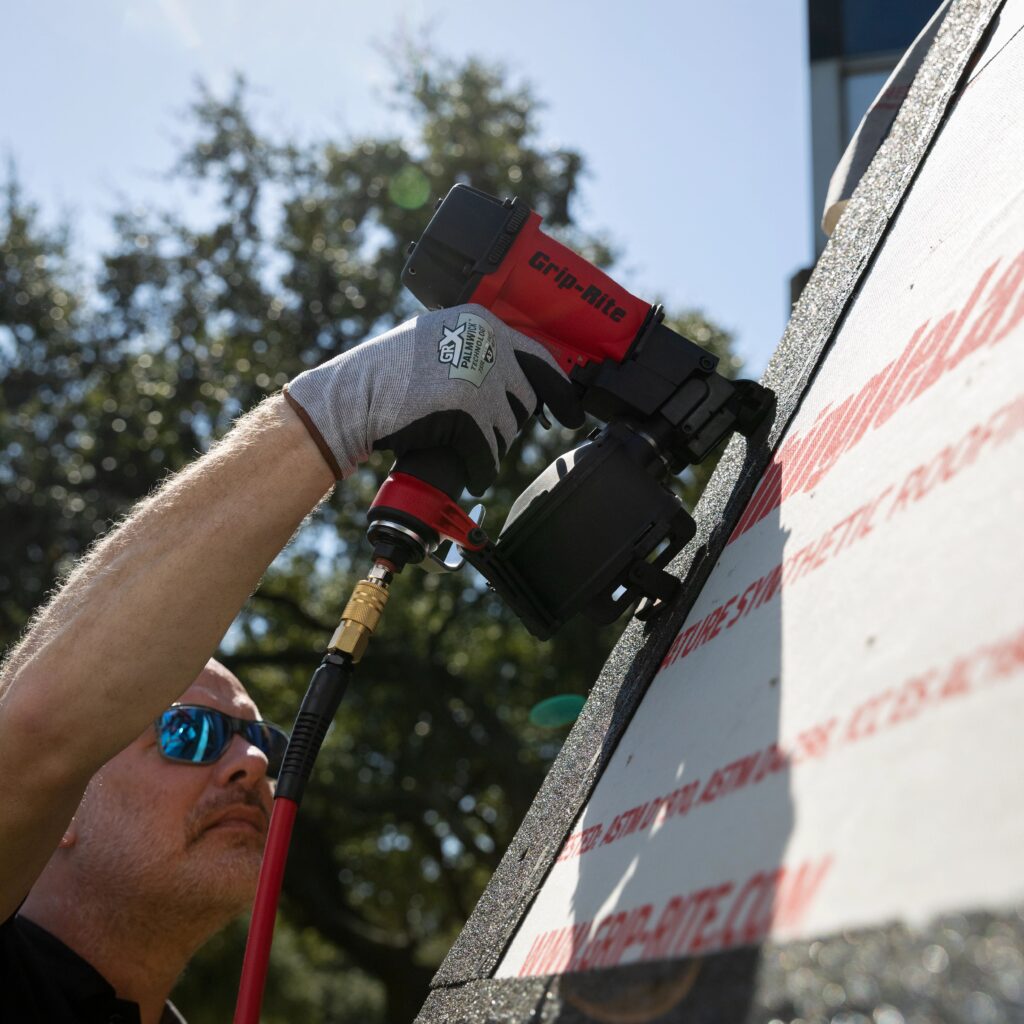
Protecting your roof deck with shingle underlayment is an important step required by international building codes. Underlayment prevents leaks and serves as a secondary layer of protection against wind and rain, preserving the roof deck.
High-temperature underlayment increases efficiency in regions that experience extreme temperature shifts by reducing heat transfer to the roof deck. Heavy-duty solutions are necessary for certain types of roofing materials, such as metal, tile, slate, or cedar shake.
Grip-Rite ShingleLayment®-HT is a heavy-duty roofing underlayment that provides more robust protection from wind-driven rain and high temperatures. Ideal for use with most roofing materials, it’s also suitable as an ice and water shield and for eaves and valleys. Suited for 180-day UV exposure, ShingleLayment-HT protects against damage before shingle installation happens.
Hopefully, our roof replacement guide has answered your biggest questions about the roof replacement process. Grip-Rite offers a comprehensive line of roofing solutions to help your contractor achieve the best possible outcome.
Using ShingleLayment®-HT for your roofing underlayment provides best-in-class performance and extreme durability. When your contractor chooses Grip-Rite, you can bet they’ll do the job right!
Find out Where to Buy Grip-Rite products near you.